This article is part of a Cookiecutter series, where we’ll be posting how-tos for Cookiecutter and common pitfalls that we’ve encountered.
Overview
Cookiecutter is a ready-to-use CLI (command line interface) that allows you to create new projects or microservices from scratch using a predefined project template. It’s written in Python and is open-source on GitHub.
Over the last few months, we've shared several articles on how to use existing Cookiecutter templates to power standardization across your company:
Using existing templates is great, but the true power of Cookiecutter is that it lets you easily write your own template from scratch. With custom templates, you can help your engineering organization follow standards and best practices around naming, foldering, and other boilerplate. Templates also help you bootstrap new projects and services, so developers spend less time copy-and-pasting variables.
Creating your own template with Cookiecutter is not only powerful — it’s also very simple. You don’t have to know or write Python to use Cookiecutter. You just need to modify a cookiecutter.json file and use the tags {{ and }} to indicate where input parameters should be filled into your template. It really is that straightforward.
In this how-to, we'll go through building your own simple Cookiecutter project template to get comfortable with the syntax. From this, you can go on to building production-ready templates from scratch 💪
Cookiecutter Template From Scratch
Prerequisites
Cookiecutter is written in Python and relies on the Jinja templating engine.
This tutorial assumes that you have Python and the Cookiecutter CLI installed. If you do not, you can follow the instructions here to install Cookiecutter.
Step 1
Let's start by creating a new directory and changing our working directory to that folder by doing:
mkdir FirstCookieCutterTemplate && cd FirstCookieCutterTemplate
Step 2
The next step is to define the template’s output directory, where your template’s output will be generated. Cookiecutter lets us templatize directory names and filenames. Let’s templatize the output directory by running the following command:
mkdir {{cookiecutter.repo_name}}
The syntax we’ve used indicates that repo_name will be part of our template. The developer will be prompted to specify repo_name when they run the cookiecutter command.
Step 3
Now, cd into the newly created directory and create a templatized file. We’ll use a Shell script:
cd \\{\\{cookiecutter.repo_name\\}\\} && touch {{cookiecutter.file}}.sh
Then, open {{cookiecutter.file}}.sh and copy and paste the following line:
echo "Hi!!! {{cookiecutter.username}}"
Step 4
Now we’re ready to start writing our first cookiecutter.json file. This JSON file is where the magic of Cookiecutter happens. All the template tags we've defined above (everything between the {{ and }}) will be templatized in this file, meaning the user will be prompted to pass-through inputs when they run the cookiecutter command.
Let's go back to the root directory and create a cookiecutter.json file with the following contents:
{
"repo_name": "Service",
"file": "First",
"username": "maddymanu"
}As you can see, we have a JSON file where the keys represent a list of all of our template tags. The values for each key represent the default values that Cookiecutter will use if the user chooses not to input their own values.
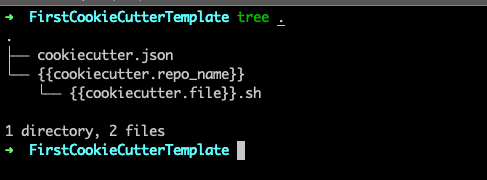
Our template directory tree now looks like this:
Testing our cookiecutter
Now that we have our template ready, let's try it out. Change your directory to the root of the template directory, and run the following command to build your cookiecutter project:
cookiecutter FirstCookieCutterTemplate
You'll see the following prompt, where you can enter values for each template tag. If a value isn’t specified, Cookiecutter will use the default from your cookiecutter.json file.
 Try playing around with it. In the above screenshot, I changed the repo_name and file parameters but kept the username parameter as-is.
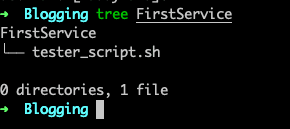
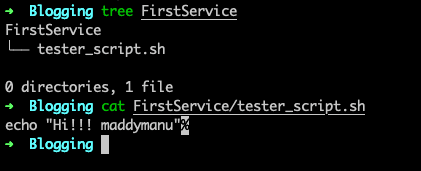
Now, you should see a directory structure like this:
 As you can see, Cookiecutter parameterized the directory name and the filename based on the inputs. Cookiecutter also lets you modify content within files. Peek inside the Shell script, and you’ll see something like the following:
Modifying an existing Cookiecutter template
In addition to creating your own Cookiecutter template from scratch, you may often find it easiest to clone and then modify an existing template. Via GitHub search, you can find thousands of different cookiecutters. For example, you could clone this Cookiecutter template for a Python package:
git clone git@github.com:audreyr/cookiecutter-pypackage.git
Then, you can change the key/value pairs in the cookiecutter.json file to adapt the template to your specific needs.
Advanced options
We started with a very simple example, but Cookiecutter isn’t just about text substitution for variables and file naming — it has a lot of powerful features that you can take advantage of to customize your templates.
Jinja features
Jinja is a highly flexible templating language. Within your cookiecutter projects, Jinja gives you nearly limitless options for writing templates that behave more like mini-programs:
Filters like urlencode() to apply basic functions to your variables
Expressions like comparisons, math operations, and abstractions such as lists and dictionaries.
Any Python methods, like {{ page.title.capitalize() }}
Macros to define and reuse your own functions within templates
Built-in tests that can take arguments, like {% if loop.index is divisibleby(3) %}
Hooks
Hooks are Python or Shell scripts that can be set up to run before or after your project is generated. They live at hooks/ in your cookiecutter project directory. They’re very useful and can help you validate variables before cookiecutter runs, remove unwanted files or directories after it runs, and much more. Here’s an example hook from Conor Sheehan that gets the absolute path to the cookiecutter project after it’s generated:
# cookiecutter-$your-project/hooks/post_gen_project.py
abs_path = os.getcwd()
for root, dirs, files in os.walk(abs_path):
    for filename in files:
        with open(os.path.join(root, filename)) as f:
            content = f.read()
        content = content.replace('replace_me.base_dir', abs_path)
        with open(os.path.join(root, filename), 'w') as f:
            f.write(content)
Bypassing user input
While it might seem like you always have to request user input to fill out the template, you can bypass this easily using the --no-input argument. Then, you can pass values as arguments to your cookiecutter project. This feature is essential if you want to use templates for CI/CD or testing.
API
Cookiecutter also has an API that you can read more about here.
Conclusion
It isn't hard to get started with creating Cookiecutter templates, and templates can be as advanced as you need. With this knowledge, you can lead the charge of standardizing project structure and microservices throughout your organization. You can have templates that set up:
Upstream dependency configurations (databases, caches, etc.)
Logging / Metrics / APM Configurations
Data science work (cookiecutter-data-science)
Language dependencies (setup.py file for Python, Gradle files for Java, etc.)
CI / CD Pipelines (Github Actions, CircleCI / Travis configurations, etc.)
Git configs (README, Makefile, etc.)
Testing & code quality infrastructure
Take a look at the Cookiecutter Django template — It lets you define a lot of capabilities and more. Furthermore, GitHub has thousands of templates available here, virtually for every major tech stack.
You can read more about the benefits of Cookiecutter in our previous blog post and you can read up on the official Cookiecutter docs here.
If you have feedback, thoughts, or questions, please shoot me an email at aditya@cortex.io! If you’re interested in working on interesting problems like this and building a brand new category in developer tooling, apply to join our team.


